The Perfect Tote - Processing the edges outwards
There is now an alternative version of the bag body for our popular shopper!
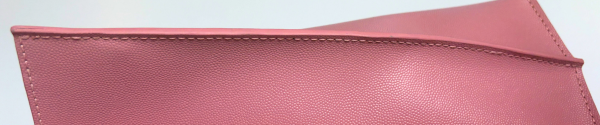
Here, the side and bottom seams are shortened and finished so that they are visible on the outside - i.e. not folded over and sewn on the inside, as in the original instructions. This can be advantageous for various reasons and gives your tote bag a completely new look with the focus on the edge finishing.
Before we start with the detailed instructions and the adjustments to the DIY box, here are the advantages of this processing method and a few tips on what you should consider before making your decision.
When is this processing method particularly useful?
- ... if you have a particularly rigid leather where folding over and sewing down the seam allowances and especially turning the bag is a little more difficult. This process is much easier, less strenuous and wrinkle-free, as the bag is sewn with the right side facing and does not have to be turned. Leathers for which this may apply include rigid leathers in the Caviar and Epi textures or the smooth leather from the standard collection.
- ... if you prefer edge finishing to sewing. The sewing time is reduced by approx. 3-4 hours with this processing variant, as both the bottom seam and the side seams are only sewn in one row instead of three rows. The seam for the pocket depth is also sewn more quickly. You will probably invest about half of the "time saved" in the additional edge finishing that is necessary for this processing.
- ... if you like the look with visible edges and edge color. The side edges of the bag are prominently visible with this finish and change the look of the Perfect Tote from a simple classic to a slightly more modern model.
- ... if you want a slightly smaller tote bag. By shortening the seam allowances and moving the seam to close the sides and base, the bag is approx. 5 cm smaller in width and depth. The base area of the bottom of this bag is 32 cm wide and 11.5 cm deep.

What should you bear in mind with this processing option?
- The bag is slightly smaller. A 14-inch MacBook Pro just fits into this version of the tote bag, a 15-inch laptop no longer. As the side seams of this version are also "steeper" at the top due to the different stitching, the basic shape of the bag is not so "bulky".
- The "Inside my Bag" bag organizer from Cherry Picking Studio just fits into the bag in this version and should not be made from bulky fabric.
- The gathering of the bag to the bucket bag shape is not suitable here. The leather straps included in the DIY box are therefore not used and are attached to the edging strip on the inside top edge.
- You will have to make alterations to the leather parts yourself by cutting off the seam allowance. Only straight cuts are necessary, but you will still need either particularly good leather scissors, a cutter knife or a rotary cutter and a ruler.
- As the edges that close the bottom depth point downwards a little more, this bag is a little more vulnerable if you often place it on rough or dirty floors. You can remedy this by hanging the bag or using bag feet.

Processing shoppers with visible edges - here's how!
Note: These instructions only explain the changes you need to make to produce this alternative version. It supplements the existing instructions that you received as a download after ordering. Steps such as making the inner pocket, attaching the magnets, attaching pocket feet etc. are not covered.
Additional step: Cut parts to size
Before you finish the shopper according to the original instructions, you need to cut some parts. If you have never cut leather before, take a look at our free video tutorial. As these are only straight cuts, which are then finished with edge color, this step is easy to do. If necessary, test the cutting of the long straight lines beforehand by making a cut a little further out on the side edges. As the cut strips are no longer needed anyway, you can practise well here.
Exception: You could still use the remnants of the bottom sections if necessary, keep them for a while.
Then cut the following parts as shown in the drawings:

Shorten 4x bottom parts from reinforcement above the row of seams by 12mm

2x pocket body made of lining: shorten by 7 mm on both sides and at the bottom
- for stretchy leathers, we recommend cutting off excess lining only after sewing
- Attention: From/as of 17.02.2025 we have new dimensions for the lining. You may have an old lining part that is shorter. Then make sure that the lining part is 45 cm wide and 34.6 cm high after cutting.


2x leather bag body: shorten both sides by 24mm and shorten the bottom by 15mm (optionally by 9mm)

Cut 1x leather edging strip to size (four cuts) and optionally pierce new holes with the awl for additional D-rings, if desired
Now carry out steps 1 - 6 as described in the original instructions. You can omit step 7.
Additional step: Processing the bottom edge
As the bottom edge will be sewn with an overlapping seam, you should finish these edges now. When finishing the edges, make sure that you also lightly "touch up" the lining with base coat and edge color so that it is slightly protected from fraying.
Tip: If you want to protect the inner seam, which will later be "exposed" with the lining, even better, you can also cut one of the cut-off strips from the bottom edge, glue it flush to the inside of the lining on the edge and then finish this edge. Make sure that the seam holes match and that no glue gets on the seam holes, this will make it easier for you when sewing.
By the way: It doesn't matter which part of the pocket body overlaps on the inside later, as both parts are identical.
Now sew the body of the bag.
Replacement for steps 8 - 11 of the original instructions: Sewing the body of the bag
Note: Optionally, you can also sew on the inner strip of the top edge first if you find this easier (last step in this article). At this stage, you could still clamp the pieces in a sewing clamp if necessary.
First, sew the bottom edge overlapping so that one edge is on the outside and one edge is on the inside. If you covered one edge of the bottom with a leather strip from the inside in the previous step, make sure that the pieces overlap so that this edge is on the inside. The open-edged edge finished with lining is on the outside. Sew the edge from start to finish with the saddle stitch and finish the stitch as usual.
The two side seams are then sewn. These steps are now very simple, as you place the body of the bag with the inner sides (lining) on top of each other and sew the sides from start to finish using the saddle stitch. It doesn't matter which side you start from (top edge or bottom of the bag). Again, make sure to sew the thread well at the end and secure the end of the thread with a dot of glue.
Finally, you only need to finish the pocket depth seam. Place the unsewn edges on top of each other so that the bottom and side seams meet. Secure everything with a few document clips or pins. Then sew the entire depth of the pocket. Make sure that you really start at the first stitch, even if it is a little tight here due to the corner of the pocket. If necessary, prick the holes briefly with an awl to make them easier to hit.
In the middle of this seam, guide the needle through the last bottom hole of the side seams and skip a seam hole at the bottom. You are therefore not sewing through the bottom from the sides, but only through the sides and have a stitch twice as long on both the sides and the bottom.
Alternatively, you could also perform the normal saddler seam here with a lot of pulling and needle bending, but this is not necessary as this seam is still very stable and durable. Finish the seam as described in the basic guide.
Additional step: Edge processing of the sides and pocket depth
Now comes the hard work. Allow plenty of time to work on the side edges in particular, as they will come into their own on the finished bag. If there is still some lining fabric sticking out at the edge, you can now carefully cut it away with scissors. Apply as many layers of base coat until you are satisfied with the plasticity of the edge. Then apply the edge color.
When the side edges are finished, work the edges of the pocket depth accordingly.
Now make the shopper as described in the original instructions from step 12 - 20. You can omit the parts that deal with the processing of the strap for gathering (edge finishing and sewing in place). If you want to attach additional D-rings for an alternative carrying option as in step 16, you will find the positioning of the additional D-ring edging parts marked in orange in the template for cutting.
Modification step 21: Sew on inner pocket & binding strips and bind in magnets
First sew the longer part of the edging strip to the top edge of the bag body. Note that you are now sewing the front of the bag body. So if you have one side that has slight irregularities and one that is flawless, choose the flawless side and turn the bag body accordingly.
The first stitch of the saddle seam starts in the corner of the top edge and only goes through one layer of leather of the bag body. From the second stitch onwards, you will include the edging strip. Make sure you stop five holes before the middle of the bag body and then bind in the magnet. The vertical center line that you marked on the pocket body in step 1 will help you here (it lies exactly between two seam holes). When positioning the magnet part, make sure that the side with the magnet covered with lining is visible and that the curve of the magnet part is facing downwards. Then continue sewing and sew the last stitch only through the body of the bag. Finish the seam as described in the basic guide.

Now sew the two short edging strips, the inner pocket and the other magnetic piece to the second upper edge of the bag body. Start the seam in the same way as on the first side. Make sure to sew in the inside pocket in good time. You can find the correct position by overlapping the inner strip and the inner pocket by three holes.
The inner pocket lies over the edging strip, with three holes the needle goes through three layers, then you sew the pocket body and inner pocket together. Again, make sure to sew the magnetic part in the middle. The second part of the edging strip is then sewn in again as soon as you have three seam holes left at the top edge of the inside pocket. The edging strip lies between the inner pocket and the body of the bag again. Finish this seam as usual.

Now follow the instructions again to glue the edging strip in step 23 and finish the edges in step 23. Once this is done, all that remains is the final step: stuff the shopper well with towels or a cushion so that the edges and corners are nicely shaped. You can also bend the edges of the bottom a little upwards so that they don't stick out so much at the bottom.
Then your new - slightly different - shopper is ready! Congratulations!
